|
Miniature Schnauzer Grooming
Begin the grooming by dematting all furnishings. Remove matting by spraying the matted areas with a conditioner, and opening up the mats. To facilitate dematting, use a petite mat comb to break up the mats. Figure 2. Whenever possible, pull the mats apart with your fingers to prevent unnecessary coat loss. Next, remove the mats from the coat with a good slicker brush, and finish up by checking the coat with a double tooth comb to be sure all mats are removed.
Check the whiskers thoroughly. Dried food or other debris caught in the beard must be removed before bathing. If the beard is clumped together and badly matted, use the mat comb to break open the mats. Use a slicker brush to remove the mats, finish checking the beard with your comb.
Use a fine tooth comb to remove any dried matter under the eyes. This area should be cleaned out thoroughly, but should never be clipped. If a clipper is used under the eyes, the coat grows back short and stiff and may poke upward into the eye, increasing the chance of irritation to the eye itself.
At this point the schnauzer may be bathed if it does not have heavy body and head coat. However, my advice would be to remove head and body coat for more thorough bathing.
Use a #10, #9, or #7f to clip the coat on the top of the head, and to establish the eyebrow line by following the line of the colour change where the eyebrow joins the head coat, or set the eyebrow line just behind the eye socket. Figure 3
This will place the correct line for the eyebrow in proportion to the dog’s head.
The head work should show a rectangular, not cheeky skull, with thick whiskers to enhance the rectangular look of the head. The whiskers should not have a blunt cut appearance the rectangular look of the head and give a keen expression to the eye.
Clip back over the top of the head to the occiput, being careful not to nick the ear leather where the front of the ear joins the head.
Clip the ear coat, working from the base of the ear to the outer edges. Use a #15 or the #5/8 toe blade to more easily get into the hollows of the ear. Figure 4. Clip the coat on the inside of the ear in a similar manner.
Use a depilatory powder to loosen the remaining hair in the ear canal. Use your fingers or a forceps to remove the hair after it loosens. Always use an ear wash to remove remaining powder and to close the pores of the ear. Trim the edge of the ear by holding your shear at a 45 degree angle to the edge to get a neat finish without nicking the ear leather.
Clipping from in front of the ear to the back corner of the eye. If the schnauzer has a coarse head, or protruding cheek bones, stop clipping about 1/2” behind the eye. Figure 5. Clip around the under side of the jaw to the other eye. Remove the beard in a line from the back corner of the eye to the back corner of the mouth, and under the chin to the whisker nodule that can be found at approximately the center of the underside of the jaw. Grasp the beard in your hand and pull forward; then with scissors or thinning shears, trim away any unsightly short hairs to give a clean beard line. The beard should not be left bushy to detract from the appearance of a lean head.

To finish up the head work, part the eyebrow coat to each side to expose the stop. Scissors are inverted “V” at the stop between the eyes from the inner corner of the eye to the skull. Figure 6. Clean only that area between the eyebrows as is necessary to accentuate the eyebrow line. DO NOT scissor or clipper under the eyes. Figure 7.
The neck should look strong and well arched. When removing the neck coat, blend the neck coat smoothly into the body and shoulders. Work with the grain of the coat when doing the cheek and neck work on dogs with sensitivities to prevent unnecessary irritation. Clip the back of the neck from the occiput and blending off at the withers using the same blade as for the top of the skull. Figure 8. Clip with the lay of the coat on the sides of the neck. Use the 7F to blend against the grain where the two directions of coat growth meet on the side of the neck.
Clip the body coat as follows
In preparing to do the boy work, clip the underbelly using a #10 blade. Do not clip in front of the navel unless the dog is badly matted on the entire chest area.
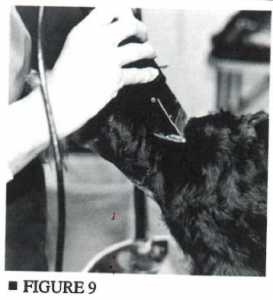
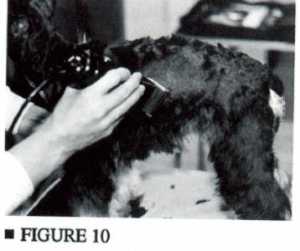
Begin clipping the body coat at the withers, using a #10, #9, or #7f blade depending on the density of the coat and the customer’s preference. Work with the lay of the coat straight back to the tail area. Keep the clipper teeth in line with the direction of the coat growth on the sides of the rib cage to prevent ridging from the teeth. Figure9. Continue around the rear area and down into the leg coat as shown in figure 14, tapering off about 1” above the hock bone. When removing the body coat on the rib cage are, it is important to accentuate the depth of rib. DO NOT leave a bib of skirting up on the rib cage since this is incorrect. After the bath, the area where the skirting meets the body coat can be blended using the #7f blade to remove the defined line and leave a more natural finish. Figure 10.
To blend off the chest hair, use a longer blade than was used to do the body coat. Figure 11. This will prevent the chest area from looking “bald” where the chest coat has a natural swirl. Tip the blade to do a ranking motion, or use thinning shears to shorten the chest coat to eliminate any appearance of a bib. Also scissor behind the front eg to remove any bulk of hair behind the elbow.
At this point, before the bath and final finishing, cut the toes nails as short as possible angling them toward the top of the foot.
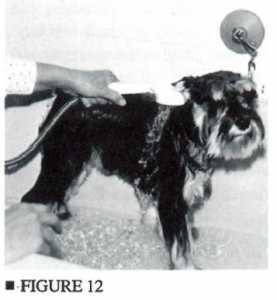
The dog is now ready for the bath. Wet down the dog and use a protein enhanced shampoo to bathe the schnauzer. Do not use a shampoo or rinse that would soften the coat. After shampooing, keep the source of water down on the body during the rinse to force the water into the coat to flush away dirt and shampoo. The water coming off the dog’s body should run absolutely free of any sign of suds, and the should feel “squeaky” clean. Figure 12
Fluff-drying after the bah is the best way to prepare the furnishings for a better finish during final scissoring. Use a slicker brush and brush upward while drying the leg coat. Be careful while drying the head coat to brush the eyebrows and beard forward and down so they will be easier to scissor for final finish.
After completing the bath and fluff-dry, re-clip any area of the dog’s coat that doesn’t lay smoothly. Blend away any obvious outline using the 7F blade, so that all area of the coat flow in natural looking lines. Figure 14.

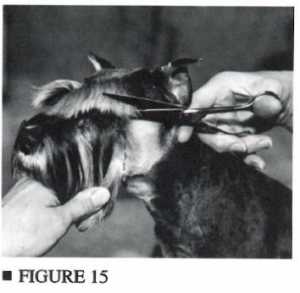
You are now ready to do the final finishing. Go back to the headpiece and complete the scissoring of the eyebrows. It may help to keep the eyebrows in place if you spray your fingertip with a conditioning spray and lightly stroke the eyebrows to set them in place. Position your shears at the outside corner of the eye, flat against the side of the skull, and cut forward toward the outside corner of the nose. Figure 15. Advanced groomers may want to use a curved shear held backward for this cut. This gives the cut of the eyebrow a slight arch and the correct keen expression of the eye for the breed profile. After finishing one eyebrow, reverse the shear in your hand to do the opposite eyebrow, making them the same size and shape. If the dog you are working on is “skully” behind the eyes, position the shear out just a little at the back corner of the eye when clipping the eyebrow. Then blend the head coat behind the eye into the cheek coat using thinning shears. After finishing the eyebrows, take the beard in your hand and pull it forward out of the way, and trim away any straggly coat at the back of the beard line.
The head study of the schnauzer seen in Figure 16 shows the keen expression and a nicely arched eyebrow. Notice that the beard line flows forward smoothly from the back corner of the eye. The beard line flows forward smoothly from the back corner of the eye. The beard is parted on the top center of the muzzle, and combed down smoothly on either side. The top of the muzzle should never be clipped. If it is clipped, it would take months for the coat to re-grow and lie smoothly again.
Scissor the coat on the bottom of the feet flat across the foot being careful not to scissor up the side of the foot. .
Trim the coat around the foot keeping the shear angled under the foot and be careful not to expose the toenails. Keep the shape of a cat foot.
There are some things to remember when finishing the rear quarters. The arch formed by the rear legs should be hand scissored, and only the very top of the arch next to the testicle or the vulva should be clipped. Figure 19.
The swirl on either side of the tail on the rump can be made neater by reverse clipping around the swirl with a 7F blade or the #9 blade depending on the length of the body coat.
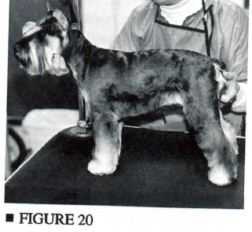
Figure 20 shows the complete grooming for this pet schnauzer. Clients will often ask that “privates” not be exposed, so this shows a slight
|